Beginner Testing & Error Handling in NextJS


Beginner Testing & Error Handling in NextJS
💬 This blog post is taking some of it's content from Lee Robinson - Testing & Error Handling (Jest, React Testing Library) - Learn Next.js
When building for production you want the ability to test everything that you do. Why would you want to do this? To allow your team to continue developing, but maintaining that your application is still working as expected. It is a standard of almost every software company. Even if there are no integration tests. There is usually some sort of static testing involving typescript and eslinting. Today we plan to go over a few methods that we can use to make our production testing smoother in React.js/Next.js.
- Unit Testing vs Integration Testing
- Jest Snapshot Testing
- React Testing Library
- Sentry Plugin
- Custom Error Page (
_error.js)
Unit Testing & Integration Testing

-
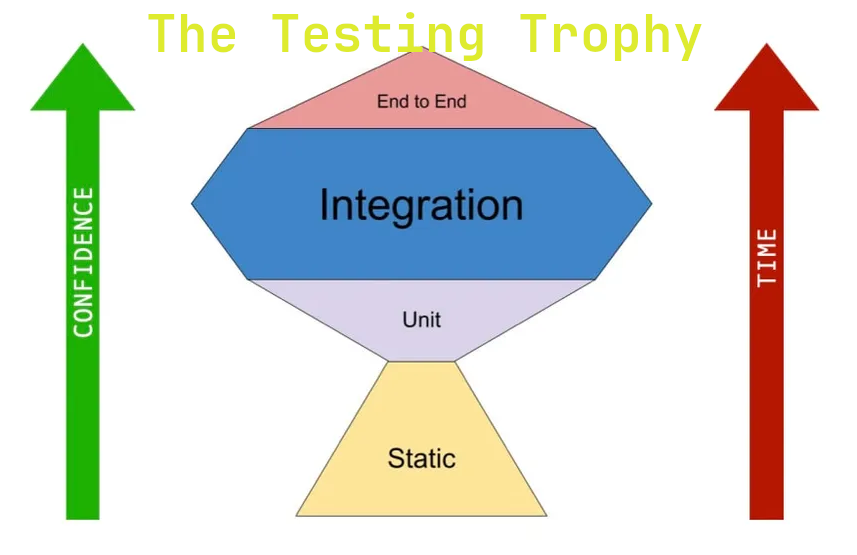
Static Tests: Utilizing tools like eslint and TypeScript. Even setting up (LSP) Language Server Protocols that allow you to add highlighting and error handling in the development environment.
🧠 For these two tests the only tool I will mention is Jest. There are other great options, but for now we will just focus on one that is tightly integrated into the React and Next development process.
Unit testing: Testing one specific module or one small piece.-
Integration Testing: You're testing how the components interact together and how it flows throughout the applications.
🧠 We will be focused on one tool as well for the end-to-end tests. This tool will be Cypress
-
End to End: Now we are testing actual browser behavior and how it's going to work. How the user is going to interact with the application.
🛑 We are testing how the users are going to be using the application. The idea is building confidence in your deployments. If you know that anything and everything that the user is going to do works. Then you're golden. The idea is having the best return on investment.
Well then why wouldn't we want to have a bigger end-to-end testing section on the trophy? It might not be the best return on investment. So you have to think about what is required for the team, scope and any other needs that come up.
Jest Snapshot Testing
Snapshot tests are a very useful tool whenever you want to make sure your UI does not change unexpectedly.
A typical snapshot test case renders a UI component, takes a snapshot, then compares it to a reference snapshot file stored alongside the test. The test will fail if the two snapshots do not match: either the change is unexpected, or the reference snapshot needs to be updated to the new version of the UI component.
A similar approach can be taken when it comes to testing your React components. Instead of rendering the graphical UI, which would require building the entire app, you can use a test renderer to quickly generate a serializable value for your React tree.
import renderer from 'react-test-renderer';
import Link from '../Link';

it('renders correctly', () => {
  const tree = renderer
    .create(<Link page="http://www.facebook.com">Facebook</Link>)
    .toJSON();
  expect(tree).toMatchSnapshot();
});
The first time this test is ran, Jest will create a snapshot file that looks like this:
exports[`renders correctly 1`] = `
<a
  className="normal"
  href="http://www.facebook.com"
  onMouseEnter={[Function]}
  onMouseLeave={[Function]}
>
  Facebook
</a>
`;
This snapshot artifact should be committed alongside code changes, and reviewed
as part of your code review process. Jest uses pretty-format to make snapshots
human-readable during code review. On subsequent test runs, jest will compare
the rendered output with the previous snapshot. If they match, the test will
pass. If they don't match, either the test runner found a bug in your code (in
the <Link> component in this case) that should be fixed, or the implementation
has changed and the snapshot needs to be updated.
💬 The snapshot is directly scoped to the data you render - in our example the
<Link>component withpageprop passed too it. This implies that even if any other file has missing props (say,App.js) in the<Link>component, it will still pass the test as the test doesn't know the usage of the<Link>component and it's scoped only to theLink.js. Also, rendering the same component with different props in other snapshot tests will not affect the first one, as the tests don't know each other.
- A complement for conventional tests not a replacement
- More useful with healthy code review process
- Work well with auto mocking
- Jest Snapshot Release Blog Post
React Testing Library
React testing library builds on top of the DOM testing library by adding APIs for working with React components.
The problem
You want to write maintainable tests for your React components. As part of this goal, you want your tests to avoid including implementation details of you components and rather focus on making your tests give you the confidence for which they are intended. As part of this, you want your testbase to be maintainable in the long run so refactors of your components (change to implementation but not functionality) don't break your tests and slow you and your team down.
This solution
The React Testing Library is a very light-weight solution for testing React
components. It provides light utility functions on top of react-dom and
react-dom/test-utils, in a way the encourages better testing practices. Its
primary guiding principle is:
The more your tests resemble the way your software is used, the more confidence they can give you.
So rather than dealing with instances of rendering React components, your tests
will work with actual DOM nodes. The utilities this library provides facilitate
querying the DOM in the same way the user would. Finding form elements by their
label text (just like a user would), finding links and buttons from their text
(like a user would). It also exposes a recommended way to find elements by a
data-testid as an "escape hatch" for elements where the text content and label
do not make sense or is not practical.
This library encourages your application to be more accessible and allows you to get your tests closer to using your components the way a user will, which allows your tests to give you more confidence that your application will work when a real user uses it.
This library is a replacement for Enzyme. While you can follow these guidelines using Enzyme itself, enforcing this is harder because of all the extra utilities that Enzyme provides (utilities which facilitate testing implementation details). Read more about this in the FAQ
What this library is not:
- A test runner framework
- Specific to a testing framework (though we recommend Jest as our preference, the library works with any framework
💬: This library is built on top of DOM Testing Library which is where most of the logic is behind the queries.
Example
Quickstart
This is a minimal setup to get you started.
// import react-testing methods
import {render, screen} from '@testing-library/react'
// userEvent library simulates user interactions by dispatching the events that would happen if the interaction took place in a browser.
import userEvent from "@testing-library/user-event'
// add custom jest matchers from jest-dom
import '@testing-library/jest-dom'
// the component to test
import Fetch from './fetch'

test('loads and displays greeting', async () => {
  // render a react element into the DOM
  render(<Fetch url="/greeings" />)

  await userEvent.click(screen.getByText('Load Greeting'))
  // wait before throwing and error if it cannot find an element
  await screen.findByRole('heading')

  // assert that the alert message it correct using
  // toHaveTextContent, a custom matchers from jest-dom.
  expect(screen.getByRole('heading')).toHaveTextContent('hello there')
  expect(screen.getByRole('button')).toBeDisabled()
})
Let's also show a more full testing file that it's just focused on a single test.
import React from 'react'
import {rest} from 'msw'
import {setupServer} from 'msw/node'
import {render, fireEvent, screen} from '@testing-library/react'
import '@testing-library/jest-dom'
import Fetch from '../fetch'

const server = setupServer(
  rest.get('/greeting', (req, res, ctx) => {
    return res(ctx.json({greeting: 'hello there'}))
  }),
)

beforeAll(() => server.listen())
afterEach(() => server.resetHandlers())
afterAll(() => server.close())

test('loads and displays greeting', async () => {
  render(<Fetch url="/greeting" />)

  fireEvent.click(screen.getByText('Load Greeting'))

  await screen.findByRole('heading')

  expect(screen.getByRole('heading')).toHaveTextContent('hello there')
  expect(screen.getByRole('button')).toBeDisabled()
})

test('handles server error', async () => {
  server.use(
    rest.get('/greeting', (req, res, ctx) => {
      return res(ctx.status(500))
    }),
  )

  render(<Fetch url="/greeting" />)

  fireEvent.click(screen.getByText('Load Greeting'))

  await screen.findByRole('alert')

  expect(screen.getByRole('alert')).toHaveTextContent('Oops, failed to fetch!')
  expect(screen.getByRole('button')).not.toBeDisabled()
})
💬 It's recommended to use Mock Service Worker library to declaratively mock API communication in your tests instead of stubbing
window.fetch, or relying on third-party adapters.